|
Electroforming - Magical Metal Creations!What Is Electroforming All About?
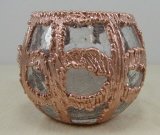
Copper Electroforming or as my grandkids call it "Copperizing", is a method of covering non-metallic objects with layers of copper. I have done this to a tree leaf, a pine cone, a baseball, many seashells, glass of many shapes and semi-precious stones like amethyst.
I have sold enough of my electroformed items online to pay for my initial investment and now making profit! If you would like to see more of my creations, Kens Copper Crafts @ ETSY.Com 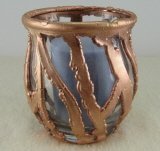
Everyone has heard of Bronzed baby shoes. In reality, these are really coated with copper using the electroforming process and equipment described here.
Other metals like nickel, brass, silver and gold can be electroformed in the same way using different solutions and metals. But, the process is basically the same.
Some Terms That Will Be Helpful In This Discussion:
DC Power Supply - Direct Current is the same kind of electricity that you get from your flashlight or car battery. In this case we will need very low voltage and very low current. So, for this process we will likely want to purchase a unit that uses household power (AC Alternating Current) and converts it to DC in a controllable way.
Electrolyte - This is a liquid that will conduct electricity. In the case of electroforming this is distilled water, a small amount of sulfuric acid (Battery Acid) and some copper sulfate crystals (Swimming pool water treatment chemical). I will give you the recipe later.
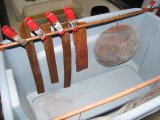
Anode - This is the metal object which will be sacrificed, dissolved into the electrolyte and then "formed" or deposited onto our non-metallic object. The positive side of our DC power supply is connected to the Anode. In electroforming, this can be a sheet of copper you purchase for that purpose, recycled copper pipe or any other copper item.
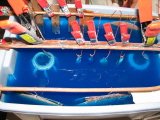
Cathode - This is the non-metallic item we are going to electroform. The metal dissolved off the anode is deposited onto the cathode basically one atom at a time. The negative side of our DC power supply is connected to the cathode.
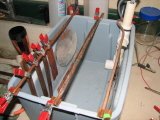
Electrolyte Tank - This is typically a plastic rectangular container but can be round and made of metal that is acid proof and non-conductive such as porcelain pot. You can use plastic buckets as well. Sizing and shape are somewhat determined by the items you want to copperize.
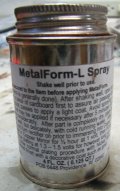
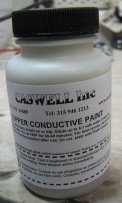
Electro-Conductive Paint - In order to get the copper, or whatever metal you are working with to deposit where you want it you have to create a temporary surface that will conduct electricity. There are several specialized paints on the web that will do this. (Tinning solution is needed for the Caswell paint and recommended for the Metalform L paint.) They seem pretty pricey but a little goes a long ways.
What You Need To Get Started Electroforming, The Approximate Cost And Where You Can Find It:DC Power Supply: This is the heart of your electroforming system. While this can be done with a car battery and some other bits and pieces I recommend purchasing a proper household current power supply. By the time you add up the cost of the bits and pieces you will nearly at the price of a proper unit.

When I started, I found on ebay a Tekpower (Sometimes called Masteck) 0-30 volt, 0-10 amp power supply. This unit cost me $180. These units come in all sizes and the one I purchased is actually oversized for my needs but is controllable to very low settings. I have electroformed a dozen items or so at the same time and the voltage was always less than 1 and the amperage less than 3. So I recommend a power supply with 0-15 volts and 0-3 amps. These are available for less than $100 at the same place I bought mine. Current should be controlled at less than 0.1 amps per square inch of surface area being deposited onto. Electroforming current flow is much lower than electroplating.
Electric Wire and Alligator Clips: For 10 amp power supply or less, use 18 gauge wire. Depending on how far you locate your power supply from the electrolyte tank you will need more or less wire. Also, to make life easier I use alligator clips to make all my electrical connections. Buy red clips and red wire for the positive (Anode) side and black clips and black wire for the negative (Cathode) side of your system. I bought all of these supplies from an electronics store for less than $10.
Plastic Tanks or Tubs: These I picked up at the local charity thrift store for $2 each. I also priced them at a department store for between $5 and $10. Again, choose the size to match the items you intend to electroform.
Sulfuric Acid: This is the most dangerous component involved in electroforming. But with some care can be handled safely. Always wear rubber gloves, a plastic apron and eye protection. A face shield is best, but at a minimum use goggles to protect your eyes. You are going to dilute the acid so there is one important rule. Always pour acid into water. If you do it the other way it will splash and spit acid droplets at you and everything around you. It can even make acidic steam. Remember, acid gets poured into water, not the other way around.
I also buy this off of ebay. It is sold as a chemical for making biodiesel. Comes in 93% to 98% concentration. I get a liter of 98% for $30 including shipping. This will make about 6 gallons of electrolyte which is a lot. I will give you the recipe a bit later.
Again with the safety, if you get this acid on your skin, walk, don’t run to a water faucet and wash it off. If washed off in 15 seconds or so it will not harm you. If you wait longer you can be burned by it. So wear the safety equipment, do your acid mixing in a sink with water on or available. I make it sound worse than it is, but I just want you to be careful. Also, make sure you store any unused acid in a safe place, away from the kids.
Copper Sulfate Crystals: Another item found on ebay. Sold as Copper Sulfate Pentahydrate 5 lbs Algae/Crystal/Plus. It comes in 5 pound bags for $24 including shipping. This is enough make about 2.5 gallons of electrolyte. In each shipment there will be a material safety data sheet (MSDS) with important safety information. Please read and follow the safety information.
Distilled Water: Purchase at your local grocery store for about $1 per gallon.
Copper Anode Material: There are a number of ways to go here. You can purchase new copper sheet material from StormCopper.com or basiccopper.com, or use new or old copper pipe which can be bought new at your home improvement store. You can also use most any kind of scrap copper material. I like to use recycled copper just to help the environment. I will show you how to make a copper anode using even the smallest pieces of scrap copper. Since I do copper metal crafting I have lots of it around. If you can find a roofing contractor in your area, they may have scraps they will sell you. Remember, it doesn’t have to be pretty, just clean and made of only copper.
Copper Conductive Paint: In order to get the electroforming process started, you have to create an electrical path on the surface of the object. This is where your creative side goes to work. You paint only where you want the copper to deposit. Intricate surface paint designs will quickly be immortalized in copper. Remember, all the paint must connect to the electrical source. I purchase the copper conductive paint from Caswell Plating.com. You get 4 ounces for about $30. It seems pricey, but it really does go a long way. I like to brush it on so I don’t waste any on overspray. Please note that the Caswell product requires a dip in tinning solution after the paint dries whereas the Metalform L does not. The disadvantage of the Metalform L paint is that you need a workspace with good ventilation as it has a strong paint smell.
Tips and Insider Information To Help Get Started:Electrolyte Recipe for Electroforming: To make a gallon of electrolyte take 1 gallon plastic jug of water and pour out about 1/3 into another container (save it). To the remaining 2/3 full jug add 2 pounds of the copper sulfate crystals. Put the cap on the jug and give it a good shake. Next add 2/3 cup or 160 ml of the 93% to 98% sulfuric acid. You will want to use a funnel for both the crystals and the acid. Put the cap back on and give it a good shake. Then refill the jug to full with the distilled water you saved. You will notice that the contents of the jug warmed up a bit when you added the acid. This is caused by the water mixing with the acid and is nothing to worry about.
Note: Use a plastic jug with a screw on cap instead of the snap on type. You really don’t want the cap to fly off when you are shaking it. The blue solution pretty but is very hard to clean up.
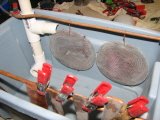
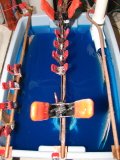
Air Agitation: A more uniform metal surface will result during electroforming from stirring the electrolyte bath gently. I have found the best way to do this is with the smallest, cheapest aquarium air pump you can find. I get the pump for under $6 at the nearby pet store. You will need a small amount of flexible air tubing and one length of the rigid air tubing.
One of the things I learned was the air agitation causes little splatters of electrolyte solution when the air bubbles break the surface. This causes blue crystals to grow on everything that get splattered. To help control this I made up some PVC contraptions to contain the splash. Please see the photos.
Turning on the Power: You can simply hook up the wires to your anode or cathode or set up bus bars like I show in the pictures. These are easily made using quarter inch copper tubing which can be hammered flat or left round. Since some of the objects you may electroform will want to float, it helps to have flat surface to clamp them against.
Set up your plastic tank and fill to the level that will easily cover the largest of your target items. Then position your copper anodes along both sides of the tank. Connect all of the wires as shown in the diagram. Turn on your power supply according to the direction that came with it. You will want the constant current setting. Don’t worry, you really can’t mess this up. Once the power is on you should see maximum volts and no amps. This is because you have not completed the electrical circuit with your objects to be electroformed. Next lower your first object into the electrolyte and immediately connected it to the negative power supply lead or clamp it to the bus bar you made. In a few minute you can pull your object out and see a small amount of copper metal beginning to form in some areas. In a few hours, wherever you put the copper conductive paint will show copper being deposited. The copper deposit should be a nice salmon color. If it is darker, say brown or even black, it means the amps are too high. If the machine is as low as it goes you will have to add some more item. An alternative is to put some object of copper into the electrolyte connected to the cathode or positive wire to take some of the current flow.
Electrolyte Filtering: About once per week I take the electroforming system down and using a funnel and a piece of flannel cloth I filter the electrolyte. Over a week of use you will see bits of "stuff" floating around in the electrolyte. There will also be a small amount of copper stuff settled on the bottom of the tank.
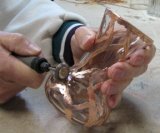
Finishing: When you take your electroform creation out of the electrolyte for the last time it will be the salmon color spoke of earlier. Rinse the item well in warm water and let dry. Once it has dried, use a dremel tool or something similar with a small wire brush to go over the surface. This will give it a bright copper shine. Copper formed by this process is very pure and very hard. It will take and keep a shine for a long time.
Some Books To Help You Get Started:Electroforming books that might be of help. I found the book "Electroplating and Electroforming for Artists and Craftsmen" by Lee Scott Newman and Jay Hartley Newman particularly useful. Also Caswell Plating.com has an ebook electroplating and electroforming manual at a low price that has an excellent troubleshooting guide.
Questions and Answers about ElectroformingQuestion from David: G'day,i am not sure if you remember me but we have emailed each other a while ago.I was very impressed with your info on electroforming,which i have just started as a hobby.I just have a question i hope you dont mind answering for me,when you wire up glass to be electroformed do you hot glue your wire to the bottom of the job and do you use a couple of wires so you get good contact and coverage?Any help will be greatly appreciated.THANKS HEAPS from David. My Answer: Hi David! Of course I remember you. No worries here as I am willing to help however I can.
When electroforming a votive candle holder or bud vase type glass object I use a length of 10 or 12 gauge copper wire to support the item. I begin by making a loop on one end of the wire that fits roughly the bottom of the vase. I solder the loop shut and then bend the remainder of the wire perpendicular to the loop. Then bend the perpendicular stem of wire such that it centers over the center of the vase or other object. The loop is then glued to the bottom of the glass vase using a gel type super glue. The loop becomes a permanent part of the vase base so make it wide enough so that it will sit upright in a stable way when you are finished. When the electroforming is finished I snip off the wire and usually have to grind the area smooth where I snipped the wire.
I let the super glue dry for at least 24 hours before applying the copper conductive paint both inside and outside the glued down loop as well as over the loop. This gives you a good conductor all the around the edge of the base. From there, I use the paint to create the design with all of the design parts connecting to the wire loop on the base. Of course, the vase is hung upside down in the electrolyte bath.
Let me know if this is confusing or if you need any other information. Best regards,
Question from Brenda: I don't really have a comment it is actually a question. I have recently started electroforming and was looking for some help. I want to plate a leaf's skeleton and I don't know what the process would be to remove the pulp from the skeleton. I also need to know the solution for the acid bath in which I would do this. If you had any information or had any idea where I could find this information I would greatly appreciate it.
My Answer: Hi Brenda! What your looking to do is called leaf skeletonizing. I have not actually done one of these myself but I have read about it. Here are three sites that give you some basic processes for doing this.
http://www.helium.com/items/561194-how-to-skeletonize-a-leaf
http://www.quazen.com/Recreation/Crafts/How-to-Make-Skeleton-Leaves.37972
http://www.hometrainingtools.com/articles/leaf-skeleton.html
I hope this helps you. Let me know how it goes and feel free to send me a note if there are any other questions! Thanks for visiting my site, Electroforming Question from Mark: When agitating my electrolyte with an air tube like you describe on your site, the air tube keeps plugging up with blue crystals after a few hours running. Any solutions to this problem?
My Answer: Hi Mark, I was also having this problem until one day I tried turning the air pump off and let it set for a while. I turned the pump back on and it worked again. So, to automate this process change I picked up a cheap timer that allows a half hour on and then a half hour off. It now runs for days without plugging and the agitation seems sufficient to keep the electroforming process going strong. Hope this helps you! Best regards,
Question from David, G'day Ken,Its David again with another question if thats ok? I would like to know if you can electroform onto ceramics and is the process the same as I used before on glass? THANKS HEAPS from David.
p.s. The glass turned out great and cant wait to do more,I really appreciate all your help and advise again THANKS.
My Answer,
Hi David!
Good to hear from you! Glad the glass worked out so well. Ceramic should be a good base for electroforming, provided it is not porous. For example, if it is fully glazed I would think it would be fine whereas a non-glazed piece might either soak up the electrolyte or begin reacting with it. As with all porous materials, you have the option of coating it with lacquer or polyurethane and then electroforming over that. Since I have not tried any ceramics I can't say with certainty. What I can say is that in doing some of the tumbled stones to make pendants, those with a high calcium content, like calcite, begin to react with the acid in the electrolyte. I believe some ceramics have calcium as a binder, much like cement, and will likely react with the acid. Some ceramics are all alumina which would not react but I don't know how you tell which ones they are.
David, you may want to try some cheap pieces as a test. I would also try testing the reactivity by placing a few drops of electrolyte on the bottom of a ceramic piece just to see if it shows signs of reactivity. Again, try a cheap piece first.
Let me know how it goes as I have been thinking about trying this with some cheap ceramics from the charity store.
All my best to you!
Electroforming Question from David, Ken, just like to know a little more about using lacquer on porous items like leather and plaster. I bought a product from Caswell here in Australia called Concentrate Sealer and it works well but the only problem is the price which was $95. As I want to electroform a lot of things which need sealing this is going to cost me heaps. I have noticed you talk about using lacquer when you need to seal your jobs.Do you use normal lacquer Ken or is it a special one? The reason I ask is I can save money if I can use a general lacquer to do the same job as the more expensive sealer. My Response, Hi David! I have had good luck using "Minwax Clear Brushing Lacquer" in a clear gloss finish. I have a quart sized can which is big enough to allow me to dip many items directly into it. I usually give an item 2 coats, but have had to do 3 coats on some items. Some items absorb the lacquer, like wood, and needed an extra coat. After the final coat, I wait 24 hours before into the plating bath. Hope that helps you out. Again all my best,
Electroforming Question from David, Hi Ken, well I finally got to electroform onto ceramics and it turned out better than I expected. I used a fish shaped candle holder which was already coated with a lacquer,the only problem was it had a hole or recess where the candle sits and it didn't plate as quick as the rest of it so I moved the job closer to the anode on one side of my tank and it worked well and plated the hole. The only thing I noticed was when I removed the ceramic piece to inspect it I noticed it tarnished really quick due to the air. Do you have any tips Ken to help with this problem? Again Thanks for all your help and advise, from David.
My Response, Hi David! Glad the ceramic effort was a success! As far as the tarnish problem, one observation I have made is that as my electrolyte gets older, the items taken out of the bath tend to turn several shades of brown. And, even after cleaning up they tend to tarnish again within a few weeks. I believe it is due to impurities in my anode copper. I use a lot of scrap pieces of copper left over from my fountain building and old copper tubing I find. Some of this can have traces of solder on them. I have been blaming this for my tarnish issues. Even filtering doesn't reverse the problem. One thing I did try recently, one time, which showed promise was I used a piece of copper sheet as my cathode and a couple of stainless steel screens as anodes and put the power to it. This I believe had the effect of removing some of the impurities by plating them onto the copper sheet. Another try which showed some recent improvement was just adding water to the electrolyte. At least in my case, the evaporation is causing the growth of bluestone crystals around the edges of the electrolyte indicating to me that the copper sulfate has reached saturation concentration. The added water improved the color of the copper after electroforming. Everytime I mix up new electrolyte I seem to get a reset to the original electrolyte quality finish. David, I hope this helps. Followup from David, Hi Ken, Thanks for the quick reply, I went on the Caswell web page and read some of the posts put up on electroforming problems. It seems this is a comon problem other platers have as well and the experts at Caswell suggest that you have a spray bottle with distilled water in it and as you remove the piece being plated from the bath you spray it with the water bottle then you put the piece under cold running water for a short time and then change the water to hot and run hot water over it for a short time and then change the water back to cold again and run cold water over your job for a short time and then wipe it dry. I will give this procedure a go when I plate next and see how I go and i will let you know if it works. I use High Phosporous copper anodes with my acid copper solution and they work excellent,they cost a lot more than using scrap copper but they will last me for years. I can't thank you enough for all your help and advice. I really do appreciate it and your more than welcome to put my questions on your web site because it might help someone with their problems and they can learn from our mistakes so they don't make the same ones. Electroforming is a great hobbie with a lot of trial and error but if we can help people avoid some of the common mistakes by posting my questions on your web page then great i'm more than happy for you to use my questions. THANKS HEAPS, David
Return To Crafts Part 2 Page
Contact Me! If you have general comments, questions, suggestions for improvement or if you would like to submit content please contact me using this link. If you submit content that I use, I will make sure you get recognition for the information you send me.
|
